google ads

Monday, October 31, 2011

iProcess Quick Restart


Check the status of iProcess Engine, and Restart Iprocess Engine

i)                    Login to primary machine (XYZ02)
ii)                   Run ‘swadm show_servers’ to list all the primary and secondary machines.


The above screenshot shows, the list of servers for DEV environment.


iii)                 Now, remember, we have to stop all secondary machines processes before stopping primary machine processes.
iv)                 Login to secondary machine, stop iProcess Engine Sentinel from ‘Services’, Stop the Jetty Server from ‘Services’.


The above screenshot shows the status of processes in all machines. In the machine ID = 2, we could see that all the processes are stopped.


According to our iProcess Architecture setup, all applications needs to connect to the director running in secondary machine (which is machine id = 2). Hence the director process has to run in machine = 2. But in order to run the directory, the SPO service should be running in machine = 2, and SPO automatically brings all other processes up. Hence we need to make sure SPO and DIRECTOR in machine = 2 are up and running.

When I logged into the secondary machine, I observed an issue that the iProcess Engine processes went down for some reason, as shown in the above screenshot. This might be due to some issue with the operating system/machine instability. We should ideally check all the logs of the services to get to the root cause of this issue.
v)                  In the secondary machine, run Task Manager and kill the pvcmgr.exe and java.exe if they are still running.


vi)                 Go back to primary, and repeat (iv) and (v)


vii)               Now, start the iProcess Engine and Jetty Service from Primary machine ‘Services’.


viii)              Check the status of iprocess engine services using swsvrmgr status –v from either primary or secondary machine.


ix)                 After the primary services shows RUNNING status, run the iProcess Engine and Jetty Server in secondary machine from ‘Services’.
Again run swsvrmgr.exe status –v, to make sure all processes are up and running fine.


Saturday, October 29, 2011

Log4J settings for TIBCO BW applications

TIBCO BW already comes with Log4J enabled. We need to change the service instance settings to setup the rollover settings for the applications.

Following screenshot shows, application configuration for TIBCO BW application. And we need to select the "Service Instance" from this configuration to set up the log settings.

Diagram 1:


The following screenshot show the application log setting for TIBCO BW application service instance. Here you can change the default values of maximum file size for the log file, and log file count for rolling over. If you want 10 files to be kept as archive, you can set here the max log file count = 10.

Diagram 2:


Thursday, October 27, 2011

TIBCO BW SOAP tracing


################## SOAP tracing ######################## REMOVE ASAP ###############
Trace.JC.*=true
Trace.Engine=true
Trace.Debug.*=true
java.property.com.tibco.plugin.soap.trace.inbound=true
java.property.com.tibco.plugin.soap.trace.outbound=true
java.property.com.tibco.plugin.soap.trace.filename=C:/soaptrace.txt
java.property.com.tibco.plugin.soap.trace.pretty=true

Saturday, October 22, 2011

Decrypting password from TIBCO global variable


Use the following java code in our java code palette and it will decrypt the password global variable. 

import the package com.tibco.pe.plugin.PluginProperties in java code explicitly.

String VarName=PluginProperties.getProperty("tibco.clientVar.ProjectName/Connections/JDBC_Connections/Password");

System.out.println (" GV password "+ VarName);


Where  <ProjectName>/Connections/JDBC_Connections/Password is Global variable which is password datatype.

The password will be printed in the System Console. If you want to print it as output, you have to tweak the code little bit.

Happy BW coding.

-Rajendra

Thursday, October 6, 2011

Adding activities inside the inner group of TIBCO Business Works process.

When you try to add an activity inside the first group, TIBCO designer works as expected. You can just an activity from the palettes outside the group, then drag-n-drop it inside the group, and it simply get added into the group.

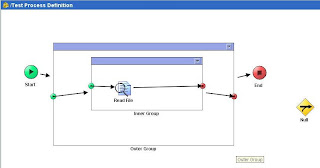
But if you have multiple inner groups, the it becomes little tricky. To give an example, if you have two groups, one inside the another one, e.g. group "inner group" is inside group "outer group", and you want to add an activity inside group "inner group", then if you try to drag-n-drop the activity inside the group "inner group", it would ask you if you want to add the activity in group "outer group", which is the parent group. But since your intention is to add the activity inside group "inner group", you do not get a simple answer for this.

Many a times, what people do is, remove the groups by un-grouping all the activities, and then adding the desired activity, and then regrouping again. But that would remove all your mappings for the group, and transitions from start of the group and to the end of the group activity. The code TIBCO BW project code gets messed up. And that is not desired. It takes too much more time to get back what you had before removing the groups.

The trick is, drag-n-drop the activity inside the inner group "inner group", and TIBCO Designer will ask the question if you want to add the activity in group "outer group", select 'No' on this option, and then it will pop-up another question, if you want to add the activity in group "inner group", now you can select 'Yes' to add that activity into the inner group "inner group".


Diagram 1: The above diagram shows an activity that we are about to add into the inside group "inner group".


Diagram 2: The above diagram shows the first question that pops up asking if we want to add the activity into parent group "outer group".


Diagram 3: The above diagram shows the second question that pops up asking if we want to add the activity into the inner group "inner group".

Diagram 4: The above screen shows, the activity is added to the inner group.


Diagram 5: Now you can add transitions to the end of the group activity.

This is a simple trick, and I found it not so intuitive and hence I wanted to share with you. I hope it has been helpful for you.

Happy TIBCO Business Works process designing. Look forward to my next blog on the common mistakes people do, while configuring the JDBC palettes, which you should not repeat.

Cheers.